Get to grips with Apple’s Files app, and discover how it can help you get at your documents – wherever they happen to be stored
In the early days of the iPhone, Apple attempted to redefine the file system. Instead of bringing across the well-known desktop-and-documents metaphor from the Mac and PC, files lived ‘inside’ of apps. Initially, this made sense, and was logical and usable. But as devices and apps became more capable, the limitations of this approach became clear.
It was tricky to move a single document between multiple apps, and to keep track of versions when sharing a project with colleagues. You’d end up with multiple copies of a single document, all at various stages of completion, and all sitting within different apps – or lurking as email attachments. What was supposed to be a refined act of streamlining had become a mess.
Dropbox attempted to make sense of the chaos. The third-party cloud storage provider became a kind of surrogate file system for iOS, rapidly gaining support across thousands of apps. Apple was increasingly cut out of the loop, and something had to give. That something became whatever process over at Apple HQ resulted in the Files app.
Using Files: On My Device vs iCloud Drive
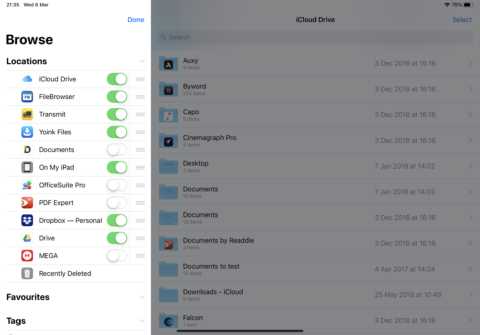
The Files app is a really smart piece of Apple design. In short, it’s a central location where you can access all your documents. The really smart bit is Files doesn’t care where they’re located. It affords you rapid access to documents on your device, those stored on iCloud, and whatever you have stashed elsewhere, all by way of the Locations section within the Browse tab.

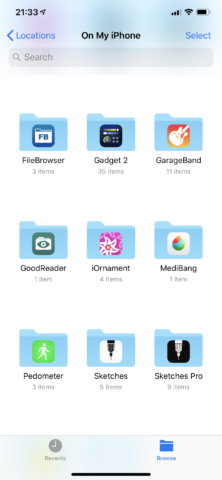
Open that up and you’ll see several options under the Locations heading. On My iPhone/iPad when tapped lists the documents folders of apps you have installed that allow file access. Everything shown here is only stored on your device, and so if your device was lost, everything would be gone for good. (Although you could restore your data from a backup – and you are backing up your device every day, right?)
A better bet, where possible, is to store documents on iCloud Drive – Apple’s servers in the cloud. Increasingly, apps save to iCloud Drive by default, and so this section will likely also be full of app folders. However, unlike On My iPhone/iPad, drag downwards and you can tap the folder button to add custom folders of your own. This frees you from having to save documents within app folders, and makes iCloud Drive much more like the flexible, customizable file system you may be used to using on a Mac or PC.
Dealing with documents in the cloud
Documents saved to iCloud Drive are available on any device signed into your Apple ID. Note, though, that Apple only gives you 5GB of storage for free, and you’ll need to pay should you require more. The entry-level upgrade gives you ten times more storage for $1/month. (Apple outlines pricing across various territories on its website.) iCloud Drive does give you a safety net, though, hanging on to deleted files for 30 days before removing them forever. (You can restore them in a web browser at icloud.com.)
![]()
It is worth bearing in mind one major factor regarding iCloud Drive: to access something stored there, you must be online, or have downloaded it prior to going offline. If your device doesn’t have cellular connectivity and you plan on working on a document during, for example, a commute, ensure it’s been downloaded to your device. Any document that hasn’t been downloaded will have a button with a downwards-facing arrow (on it in icon view, or next to it in list view). Tap that and the document will download.
Expanding locations to other providers
Because Files is broadly service-agnostic, it integrates with other cloud providers and apps. So if you have a Dropbox account, and have installed Dropbox on your iOS device, you can tap Edit in the Files app, turn on Dropbox, and then access all your files and folders stored in Dropbox via Files. The same is true for other apps and systems, such as Google Drive, Readdle Documents, MEGA, Yoink, and many more.

This is beneficial in simplifying things – if you work with a range of these products, Files gives you one place where you can access them all. Also, your active locations are available in the iOS save dialog you see when sharing a document and tapping Save to Files. Not every app uses this standard means to save documents, but most do. And those that do can therefore save to iCloud Drive, but also to Dropbox, Google Drive, and any other location you have set up on your device.
Use Files to access local network drives – and more
Files surprisingly cannot access – at least on its own – network drives. If you have a Mac or PC on your network that can share folders, Files by default won’t be any use to you. The same goes for the likes of FTP servers, if you partake in a little web design.
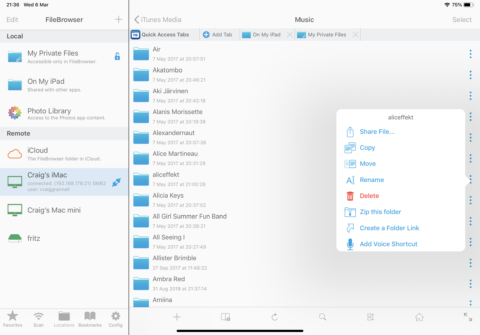
For those circumstances, you can use File Explorer Pro ($5/£5), FileBrowser ($6/£6, depicted), or the latter’s subscription-based cousin FileBrowserGO, which offers a 14-day free trial. With any one of those apps, you can sign into servers, access files, and bring them to your device.

However, the great bit is that – yes – these apps also integrate with Files! So although Files on its own cannot access anything on a Mac or PC that’s lurking in your office, it can when one of the aforementioned products is installed and configured.
What this all means is that Files enables you to get at all of your documents, wherever they happen to be located. If they’re stored on your iPhone or iPad, Files provides fast access, rather than you having to open individual apps. Whatever cloud storage provider you favor, Files lets you browse whatever you’ve stored there. And with File Explorer Pro or FileBrowser’s help, you can even explore shared folders on local Macs, PCs, and networked drives.
It’s a far cry from the old days, when Apple seemingly wanted to eradicate the file system entirely. Now, iOS perhaps has the most flexible file manager of all.

